Tuesday, July 31, 2007

Birthday Lemon Curd


L has never liked cakes. He does, however, love lemon curd above almost all other desserts. So, for his birthday a few weeks ago, in place of a birthday cake, I made a big bowl of lemon curd with surprisingly juicy lemons and eggs with vibrant yellow yolks from the Farmers' Market at Harvard.

Lemon curd is slow-cooked and eggy, much like a custard, with a bright, tangy citrus bite. Thick and prone to setting, it's perfect as a filling in tarts and cakes; it's easily spread with a knife, too, and is fabulous on scones and toast.

The summer we lived in Egypt (more on that later), I made two lemon curd tarts for L's surprise birthday dinner with friends. The lemon curd itself couldn't be a total surprise, though, because I needed help juicing the 80 or so tiny, dry, green limons (the closest thing to lemons we could find) it took to make two full batches.

Making the tart shells was an interesting process, to say the least. To make the pate brisee, I had to cut huge blocks of butter into what I hoped were American- sized sticks. I didn't have a rolling pin, so I used a Fayrouz malt soda can to roll out the dough. I realize now that I should have used a press-into-pan dough recipe! Blind baking the tart shells was trickier, as our small oven had a solid metal door and three heat settings: low flame, medium flame, and high flame. I decided to use the medium flame setting, and I was so nervous about the whole operation that I opened the oven every few minutes to make sure the shells weren't about to burn. For reasons entirely unrelated to skill, the tart shells came out beautifully flaky and tender.

Unfortunately, I didn't have the same beginner's luck with the lemon curd. Everything seemed fine at first, but after I'd poured it into the cooled shells and left the tarts on the counter to set, the lemon curd separated into a weepy, curdled mess. The culprit? I suspect it was a combination of the 115'F Egyptian summer heat and my fear of putting the loose tarts into the fridge before they'd had time to set. I carefully scooped the lemon curd back into the saucepan, cooked it a bit longer, poured it back into the tart shells, cleaned up the edges as best I could, and put the tarts directly into the fridge. Thankfully, they set beautifully the second time.

This recipe comes directly from L's mom, who makes gorgeous, highly-addictive lemon curd tarts. She has infinite patience and great skill when it comes to baking, and she loves making tiny desserts, so she often makes hundreds of bite-sized, delicate tartlets. In order to make this batch of lemon curd last a bit longer, and to preserve my sanity, I poured the lemon curd into a bowl and we ate it, spread thick, on crusty baguettes and sweet, eggy challah. We didn't miss the birthday cake at all.


Lemon Curd
Enough for one medium-sized tart

5 large egg yolks, beaten
1 cup granulated sugar
1/2 cup lemon juice, squeezed from room temperature lemons
1/2 cup (1 stick) unsalted butter, cut into small pieces
2 tablespoons grated lemon rind

Strain the beaten egg yolks through a sieve into a small (1-2 quarts) heavy saucepan. Add the sugar and lemon juice, stir to combine, and cook over low heat, stirring constantly, for about 10-12 minutes. The mixture will start to thicken a bit after about 8 minutes.

Stir in the butter, a piece at a time (let each piece melt before you add the next), until fully incorporated. Stir in the rind. Let cool completely. Pour into a baked tart shell, or cover the surface with plastic wrap, store in the fridge, and use as a spread for toast.

Note: If your eggs tend to scramble, you can make this in a double boiler set over barely simmering water.

Saturday, July 28, 2007

National Milk Chocolate Day


Today is National Milk Chocolate Day!
A bit of history, courtesy of the Online Etymology Dictionary:

chocolate
1604, from Nahuatl xocolatl, from xococ "bitter" + atl "water." Brought to Spain for first time 1520. John Hannon (financed by Dr. James Baker) started the first chocolate factory in the U.S. in Dorchester, 1780; Baker later founded Baker's Chocolate. Chocolate chip is from 1940.
"To a Coffee-house, to drink jocolatte, very good" [Pepys, "Diary," Nov. 24, 1664].
How will you celebrate?

Thursday, July 26, 2007

Clothilde Dusoulier's Oven-Roasted Ratatouille


In June, I wrote about Pixar's delightful new summer movie: Ratatouille. I loved it, and I am happy to see that I am not the only one!

Of course, while leaving the movie theatre, I realized that I was going to crave ratatouille until I could get my hands on some zucchini. Lucky for me, Pixar timed the movie's release perfectly: midsummer marks the beginning of zucchini season in New England, and without fail, gardens and farmers' markets are flooded with the shiny, delicately flavoured fruits (yep- biologically speaking, they're both squash and fruit). The farm (as we call it) is fabulous when it comes to strategic planting, and last week the eggplant, zucchini and summer squash made their first appearances together at the weekly pickup tables. The lily-white summer onions are coming out in full force, so we took home a huge bunch of them as well.

I knew just what to do.


Last summer, after an uncomfortable evening spent making a very traditional version on a hot stovetop, I stumbled across an easy recipe that immediately became the only ratatouille recipe I will ever use: Clothilde Dusoulier's Ratatouille Confite au Four (Oven-Roasted Ratatouille).

I omit the green peppers, substitute a mix of regular and cherry tomatoes, double the onions, and add summer squash.


Just as Clothilde* says, roasting with a bit of salt gives everything a gorgeous savoury-sweet flavour, with a good texture and no trace of mushiness. And she's absolutely right- the flavour of this ratatouille improves the next day, and the day after that, which means it's a perfect make-ahead dish when you're having lunch or dinner guests. If you have an overabundance of zucchini, or even if you don't, I recommend trying her recipe. You just might find yourself eating it all summer long!

* I don't know her personally, but I feel a bit silly calling her "Ms. Dusoulier"! I hope she doesn't mind...

Monday, July 23, 2007

Super Chilis + Coconut Chicken Curry

This year, we decided to indulge in a few small pots of hot peppers for the container garden. I went for a varied collection and ended up with Habañero, Hot Portugal, Thai Dragon, and these:


The peppers took weeks to grow tiny blossoms...


... and then, in the blink of an eye, we had plump little peppers everywhere! The weather here has vascillated wildly between searing heat and cooling thunderstorms, and it seems that the peppers have enjoyed it far more than we have.


We have been trying to use up these
little pods of fiery goodness as fast as we can, since they can be eaten at any stage. If you let them grow long enough they turn yellowish-green, then bright rusty orange, and finally a sizzling shade of red.

These chilis work especially well in one of our favourite curries (original recipe courtesy of Gourmet). This is the first curry I ever made, and my paper copy is now smudged and well-worn.
Because I can't leave recipes alone, I offer my own tweaked version here. If you have the time or a willing friend/sous-chef and can make two curries, this goes very well alongside a tomato-based jhalfrazi or a creamy yogurt-based korma.

Coconut
Chicken Curry
Serves 6

3 medium-sized yellow onions, diced
6 shallots, peeled
6 large garlic cloves, peeled
one 2-inch piece fresh gingerroot, peeled
3 tablespoons curry powder or curry paste
one 14-ounce can unsweetened coconut milk
1/2 cup chicken broth
2 tablespoons safflower or other high-heat-tolerant oil
one fresh chili , chopped (optional)
1 cinnamon stick
2 whole cloves
1 star anise
1-2 teaspoons salt + more to taste if needed

3 pounds boneless chicken breasts, cut into 1 inch pieces

In a food processor or with a knife, mince shallots, garlic, and ginger.

Pat chicken dry with paper towels and season with salt just before browning. In a large, heavy skillet, heat oil over medium heat until hot and brown chicken, transferring to a large plate when done. You may need to do this in a few batches.

When the chicken is done, add onions to the pan and saute until translucent and golden, stirring frequently. Add shallot paste and curry powder and and cook, stirring, 1 minute. Add chicken (with any juices that have accumulated on the plate) and remaining ingredients, and turn the heat to low. Simmer covered, stirring occasionally, until cooked through, 15-20 minutes. Taste and correct for salt.

Discard cinnamon stick, clove, and star anise. Serve over rice.

Thursday, July 19, 2007

Black Bread


During my 3rd year of college and the summer afterwards, I was lucky enough to conduct my theatre and Russian studies at a somewhat-famous theatre school in Moscow, Russia.

My wonderfully crazy Polish roommate* and I lived with 30 Russian students in a tiny dorm right smack in the centre of Moscow. As with most cities, the centre was the ultimate in prime real estate- we were a 15-20 minute walk to school, which just happened to be the next street over from the Kremlin and Red Square.

The dorm was modest and cozy, and I made some of my closest friends there. We had small kitchens on each floor that got the job done, though the ovens were notoriously unreliable and cooking became an engaging, and often hilarious, group activity, since you were able to fit approximately one and a half, or two very slender, people in each kitchen at a time.


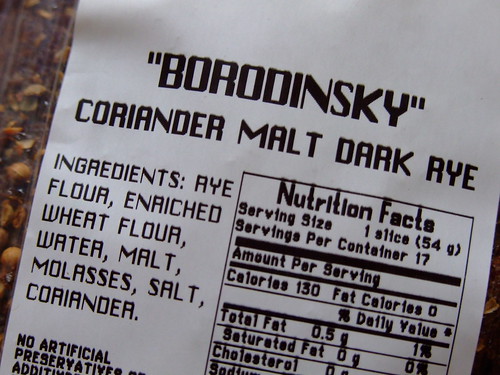
As ten-hour days of classes, held six days a week, often left us too tired to cook anything for breakfast, most of us ate черный хлеб, or black bread, with various toppings in the morning. Black bread is incredibly dark, of course, and the flavour is a hard-to-describe combination of malty sweetness** and rye tang. I think its closest relative must be European pumpernickel.

I have two favourite black bread toppings, the first being butter and Hero sweet orange marmalade, and the second being creamy Laughing Cow cheese wedges (the kind that come individually wrapped in very thin tinfoil) and a few slices of tomato.


Black bread is something that I've had a very hard time finding in the states. When I came back from Russia, I went a few years without tasting it at all. A few weeks ago, however, I found one familiar-looking loaf at my favourite grocery store, hidden amidst the baguettes, foccacias, challah, brioche and country breads. I couldn't believe it at first- would it taste the same as the bread I'd eaten Russia, or would it be just different enough to be frustratingly disappointing?

I took the plunge, apprehensive as I was, and I am thrilled to report that it's exactly the same as my beloved Russian bread. The good news is that L prefers other breads, so we can pick one up each week and I will have the entire loaf to myself! If you have a European bakery or international grocery store near you, keep an eye out for black bread. It makes fantastic toast and delicious sandwiches.

* The crazy roommate quickly became one of my dearest friends. She once came very close to marrying a charming Italian man who built her a bicycle out of an odd assortment of stolen bicycle parts. Romantically bohemian, non? In the interest of witness protection, I am not at liberty to say where he procured the bicycle parts.

** This sweetness is the result of our friend, the Maillard reaction

Monday, July 16, 2007

Roasted Summer Vegetables


golden beets

Until recently, I thought that I would never, ever like beets. There was something about their earthiness that was too much like actual dirt, and I don't mean the moist, luxurious, rich, fragrant black-earth type of dirt.

Then, we went to dinner at The Elephant Walk, a fabulous Cambodian and French restaurant in Cambridge.
I decided to give beets another try and ordered an extraordinary warm goat cheese and roasted beet salad. The salty tang of the goat cheese perfectly showcased the delicate, earthy sweetness of the tender beets, and it was the first time that I was able to really, truly enjoy them (happiness of the, "I'd definitely order these again!" variety). I started to think that I might secretly like beets after all! I'm always grateful when someone proves me wrong about these things.

Last week, we brought home bunches of tiny beets from the farm, and I wanted to recreate the flavours of that salad.
I know it seems absurd to roast anything at the height of summer, but it really does bring out the best flavours of these vegetables. And best of all, this is the time when beets, onions and carrots are tiny, tender and at their summer peaks. Try these on one of those rare cool summer nights when you can bear to turn on the oven.

Red beets stain anything and everything; unless you don't mind violet-stained hands and clothing, be sure to wear an apron.

These vegetables are particularly good alongside roast chicken or as part of an antipasto platter. I love them as finger food- no forks needed, and on top of toasted, goat-cheese-smeared baguette slices, if they last that long!


Roasted Summer Vegetables
serves 4 as a side course

6-8 small red beets, peeled* and quartered
6-8 small golden beets, peeled* and quartered
2 small yellow onions, peeled and quartered
2 small red onions, peeled and quartered
6-8 small carrots, peeled and cut in half widthwise
3 tablespoons extra virgin olive oil
1 tablespoon orange juice (optional)
1 teaspoon kosher salt, plus more to taste
3 sprigs fresh rosemary

Preheat oven to 400’F.

Toss the beets, onions, carrots, olive oil, 1 teaspoon kosher salt, and rosemary sprigs in a roasting pan until everything is evenly coated.

Roast for 35-45 minutes, tossing once or twice, until the vegetables are tender when pierced with a fork. Remove from the oven and toss with the orange juice, if you wish.

Taste and correct for salt. Serve hot or at room temperature.

*To peel the beets, use a sharp vegetable peeler. If you have rubber or latex gloves handy, wear those while you peel and slice. If you don't have gloves, you can hold the beet firmly, while you peel it, in the palm of your hand with a folded paper towel between your palm and the beet. Otherwise, just hang onto them barehanded and enjoy the gorgeous red stains on your fingers!

Friday, July 13, 2007

Chimichurri


Chimichurri is an Argentinian marinade and sauce that, traditionally speaking, accompanies grilled beef. I first tasted it at Tango, a fabulous Argentinian restaurant in Arlington. They have bottles of it on each table, and you are encouraged to pour it liberally on the vast array of beautifully grilled meats on their menu (if you go to Tango, try the flank steak- it's fabulously juicy and flavourful).

From what I've read, this will sound blasphemous to purists, but I'm going to say it anyway: chimichurri is good- really, really good- on just about anything!

We recently hot-smoked a pork loin for a dinner with friends, and I decided that chimichurri would be a fabulous complement to the smoky, tender meat. I naïvely thought it would be easy to find a good, straightforward recipe. It turns out that finding chimichurri recipes is easy... but deciding which one to use is not so simple!

As with many recipes, it seems, there are numerous debates as to what makes up the authentic version. Cilantro? Hot pepper? Tomatoes? Bell peppers? Carrots? The debates are numerous, and I quickly found myself lost in a sea of recipes. In the end, I decided that I should be more adventurous, and that I really didn't want carrots in my chimichurri.

I started with the basic common-thread ingredients: olive oil, vinegar, parsley, oregano, garlic and salt. Because L and I both love strong, spicy flavours, I added a few things I saw in the simplest versions: onion, lemon juice and spicy pepper. I pulsed everything briefly in the food processor, asked our friends to taste and review, adjusted a few things, pulsed again, and pretty soon ended up with a mixture that everyone liked. It turned out great the first day, but the leftovers were even better the second day.

Add this to your make-ahead list, or keep a jar of it in the fridge (if you're as addicted as we are), and you'll have one less thing to worry about at meal time.


Chimichurri
makes approximately 2 cups

1 large bunch flat leaf parsley
2 large or 4 small stalks oregano, leaves reserved and stems discarded
5-8 cloves garlic (start with 5)
1/2 of one medium red onion
2/3 cup extra virgin olive oil
2-3 tablespoons red wine vinegar (start with 2)
juice of 1 lemon, plus more to taste
1-2 teaspoons sea salt (start with 1), plus more to taste
1 small spicy pepper, stem removed (optional)

Put all ingredients in a food processor and pulse until you have a thick paste. If you don't have a food processor, mince the herbs, onion, garlic and spicy pepper as finely as you can, then stir in the liquid ingredients. Taste and correct for vinegar, lemon juice, garlic, and salt- you're aiming for a bold, savoury flavour here, but don't forget that chimichurri will intensify as it sits.

If possible, let the chimichurri sit for at least one hour before serving.

UPDATE: I recently experimented a bit and made this with:

lime juice instead of lemon
thyme instead of oregano
small, newly harvested summer onions instead of red onion

It was just as good! We also discovered that, like pesto, chimichurri freezes really well.

Wednesday, July 11, 2007

Oriental Lilies


The first oriental lilies have bloomed, vivid pink and sweetly fragrant. It looks as though we will see many more blossoms this week!

Tuesday, July 10, 2007

Stovetop Smoker + Herb-Rubbed Smoked Pork Loin


Last Christmas, in the spirit of his love of meat and charcuterie in particular, I gave L a stovetop smoker. The idea, for now anyway, is that we'd try out basic hot-smoking, and if he really enjoyed it, later on down the road (i.e. when we have $400 to spend and a lot more space), we could look into getting a nice big multi-tiered smoker. If we win the lottery tomorrow we can get one immediately, of course.

I was a bit wary of the stovetop smoker, so I read a lot of reviews before I bought it. It seemed impossible that someone could engineer a gadget that works well but doesn't fill your house with smoke or spontaneously combust (don't ask me where I got that idea). The people who reviewed it made no mention of house fires; in fact, they really seemed to like it. I decided to go for it.

It's important to note that with the smoker comes an assortment of wood chips and, thankfully, a helpful instruction booklet. Since I had no idea what to do with the thing beyond setting it up, I bought L a cookbook specifically written for stovetop smokers, too. If you're in the market for a smoker like this one, I highly recommend this cookbook- it has some good straightforward recipes and helpful wood-to-food matching and timing tips for those who want to strike out on their own.

Another great feature of this smoker, and something that sealed the deal for me, is that the entire ensemble is dishwasher-safe, so if you have a dishwasher, you can stick the smoker right in the after you're done.

We got started late and have used it only twice so far, both times to smoke a pork loin. The first time, L brined one 1-pound pork loin for two hours, rubbed it with garlic-rosemary paste, then smoked it for 30 minutes with hickory chips. The pork loin was small enough that it was cooked all the way through by the hot smoke, and we didn't have to finish it in the oven.

The second time, I brined two 1-pound pork loins for 7 hours, rubbed them with the same garlic-rosemary paste, smoked them for 30 minutes with applewood chips, then put the entire smoker into a preheated 400'F oven for 20 minutes. Both versions were wonderfully smoky and juicy, though we both preferred the mellowness of the applewood to the barbecue sauce aroma of the hickory.

For those of you who happen to have a smoker, here's the recipe we used. If you don't have a smoker, don't worry- you can roast the pork in a 400'F oven (20-30 minutes per pound) with tasty results.

Herb-Rubbed Smoked Pork Loin
Adapted from Smokin': Recipes for Smoking Ribs, Salmon, Chicken, Mozzarella, and More with Your Stovetop Smoker

for the brine:
3 sprigs fresh rosemary
3/4 cup kosher salt
1 tablespoon sugar

for the herb paste:
1/3 cup fresh rosemary leaves
1 tablespoon olive oil
1/2 teaspoon freshly ground black pepper
10 cloves of garlic, peeled and halved (it seems like a lot, but the flavour will be mellow)

two 1-pound boneless loin of pork pieces

To make the brine: Heat 3 quarts water, 3 sprigs fresh rosemary, salt and sugar to simmer in a large pot. Stir until the sugar and salt are dissolved. Remove the pot from heat and cool to room temperature.

Submerge the pork in the brine and refrigerate for at least 2 hours and up to 12 hours.

To smoke the pork: When the brining is done, put the garlic cloves, 1/3 cup rosemary leaves, olive oil and pepper in a food processor and process until everything is finely chopped (or just finely chop everything and mix to combine).

Set up the smoker with 4-5 tablespoons of applewood chips spooned right into the middle of the pan.

Drain the brined pork and pat it dry. Rub the herb paste all over the pork. Put the pork on the metal smoker rack and fit the cover on tightly (you can bend it a little to do this), making sure that it does not touch the sides of the smoker, if possible. Put the smoker on the stovetop and center it so that the burner flame is directly underneath the wood chips. Turn the burner to medium heat, set a timer for 20 minutes, and the let smoking begin! After the pork has smoked for 20 minutes, turn the oven to 400'F and place a rack in the middle. Smoke the pork on the stovetop for another 10 minutes, transfer the entire smoker ensemble to the oven to finish cooking.

When the pork is cooked all the way through (until the center registers 155-160'F on an instant read thermometer- about 10-15 minutes in the oven), remove it from the smoker and cover with foil for 15 minutes to let the meat rest.

Carve against the grain of the meat fibers, to avoid chewiness, and serve.

Sunday, July 8, 2007

Caldo Verde / Portuguese Kale Soup


We've been taking home enormous bunches of kale from the farm, and in the interest of putting it to good use, I've been planning to make a huge pot of caldo verde, or Portuguese kale soup.

Caldo verde, literally "green soup," is said to have originated in the northern region of Portugal. It's eaten all over the country, and is considered by many to be the Portuguese national dish.

It doesn't look like the most beautiful soup, but don't be fooled by its humble appearance. Wonderfully comforting and surprisingly filling, it is thick with creamy potato and thin ribbons of jade-green kale. It's also a great way to incorporate healthy greens into your diet: kale is naturally high in antioxidants, calcium, and vitamin B. If you're feeling under the weather, this is the perfect antidote (bonus: if you choose spicy over mild chouriço (pork sausage), it will clear your sinuses, too!).

If you're vegetarian, omit the chouriço, substitute vegetable broth for the chicken broth, and add a cup or two of cooked white beans for protein.

You can eat caldo verde as a first course, or on its own as a one-dish dinner. Try it in June and July, when kale is at its peak.


Caldo Verde - Portuguese Kale Soup
serves 4 as a main course

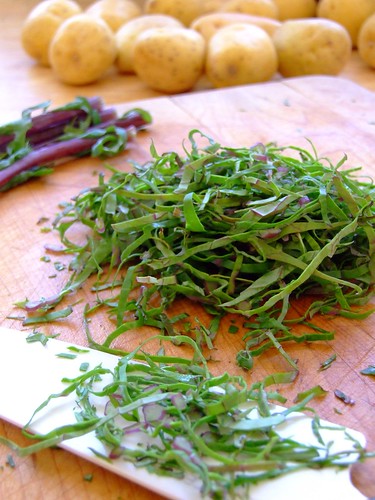
1 large bunch of kale, cut into as fine chiffonade as you can manage*
3 pounds small Yukon Gold potatoes, peeled and cut into 1-inch cubes
3 cloves garlic, minced
one handful scallions, sliced into thick rounds
8 ounces mild or spicy chouriço, sliced into thin rounds
2 tablespoons extra virgin olive oil
2 teaspoons kosher salt, plus more to taste (this will depend on the saltiness of your chouriço and broth)
64 ounces (8 cups) chicken broth

Toss the chouriço rounds into a large heavy pot (3+ quarts, preferably enamel) and turn burner heat to medium. Cook for 3-5 minutes, until they release a fair amount of their paprika-laced oil, but before they get really browned. Turn off the heat, remove the chouriço to a plate and pour off all but a tablespoon of the oil.

Return the burner heat to medium. Pour 2 tablespoons of olive oil into the pot with the chouriço oil and let it heat up for about 30 seconds. Add garlic and scallions and saute for 2 minutes, stirring often, until the garlic is slightly coloured. Do not let the garlic get too brown, or it will turn bitter. Add potatoes cubes and broth, and turn the heat to high. Cover and bring to a boil. As soon as it boils, turn the soup back to medium and cook, stirring occasionally, for 15-20 minutes, until the potatoes are tender. When the potatoes are done, use a potato masher (carefully, as the soup is still hot) to coarsely mash the potato cubes. This will give you a lovely thickened broth with a satisfying chunky texture. Add the kale ribbons and gently simmer the soup for another few minutes, until the kale has softened slightly.

I like to let it rest, covered and off the heat, for 15 minutes, to let the flavours soften and meld. Serve with thick slices of good, crusty bread.

* To chiffonade kale, break off the stems where they start to produce leaves. Pile 6-8 leaves on top of each other and roll them up lengthwise, tightly, like a cigar. Starting at the top of the roll, use a very sharp knife to cut the thinnest slices you can manage (if you're like me, you'll end up with some thick ones- this isok !). Continue slicing down the cigar until you reach the bottom end of the kale. You should have a pile of very thin kale ribbons.

Thursday, July 5, 2007

A Fungus Among Us + Natural Cleaning Solutions


What do mushrooms and insulation have in common? More than you might think!

Now that I've got you thinking green, I want to put in a quick plug for natural cleaning products. We've been using natural, cruelty-free products like shampoo, lotion, and toothpaste for a while now, and we have made sustainable/local food and energy-conserving choices whenever possible. I've been happy with our efforts (and the products we've found) so far, but I'm always thinking that we could do more.

So, last year we made the switch to natural cleaning solutions. I'd heard good things about Seventh Generation- a Burlington, Vermont-based company- and it turns out that (around here, at least) their prices are not a penny above our old products.

Fueled by great reviews, good prices and some sobering statistics, I took the plunge and bought their dishwasher powder, liquid dish soap, laundry detergent, and bathroom tissue. Initially, I was a little doubtful about the idea of natural cleaning products, since the brands we used to buy clean so darn well. How could anything without chemicals do the same job?

Now that I've used a bit of everything in the past few months, I am wondering why we didn't switch sooner. Our dishes, pots, pans, sheets, towels, clothing and more are sparkling clean... without the added pollution!

This month, I am making the switch to Method kitchen and bathroom cleaners. After a month or two, I'll let you know how they compare to our regular (soon to be old) products!

(Wondering about the title? Goofy, I know. But how could I resist?!)

UPDATE: I'm definitely a fan of the Method cleaning solutions! They clean up grease and dirt easily, and I'm not stuck scrubbing until my arm wants to fall off. I think I'd prefer a fainter scent, but I'm happy that they don't smell like chemicals.

Wednesday, July 4, 2007

National Ice Cream Month


sticky toffee pudding ice cream

Since 1984, the US has celebrated National Ice Cream Month each July and National Ice Cream Day on the third Sunday of the month (July 15, 2007).

It seems that everyone around here goes a little crazy for ice cream during the summer months. Epicurious named their top ten favourite ice cream parlours in the US; I was happy to see that Toscanini's, a well-known Cambridge institution among ice cream lovers, made the cut for their fabulous flavours like Grape Nuts, cake batter, prune and armagnac, cardamom, and burnt caramel. In fact, the New York Times has named Toscanini's ice cream "the best ice cream in the world." If you can't get to a cone or pint of Toscanini's, see if a shop near you made the Epicurious list!

If you, like me, are interested in random culinary facts, you might like to know that, according to the International Dairy Foods Association, the most popular ice cream flavours in the US are: vanilla, chocolate, neapolitan, strawberry, and cookies and cream. I don't have an absolute 100% favourite flavour, but if I had to choose, I might pick the sweet cream ice cream that L's parents magically procure each summer from a small ice cream shop in Maine. It's delicious, and I have no idea where they get it. I wonder if it isn't better that way?!


our ice cream scoop (c. 1930 and still going strong!)

When then-President Ronald Reagan proclaimed the US ice cream holidays in 1984, he asked people to "observe these events with appropriate ceremonies and activities." Another excuse to eat ice cream? I can do that!

If ice cream is not your thing (but how could you?!), July is also National Baked Bean Month*, National Hot Dog Month, and perhaps my favourite, National July Belongs to Blueberries Month. Can you find a better excuse to eat up?

*
I'd like to know why something like baked beans, which in my mind means long heat-up-your-kitchen cooking, has been relegated to July. Why?!

Sunday, July 1, 2007

Snapdragons


When I said (yesterday) that our snapdragons were going to bloom soon, I had no idea that we would have 12 blossoms this morning!


I'm feeling a bit under the weather, so there's not much cooking going on around here at the moment. Perhaps L and I will be up for making something later today. Given the cool weather and my icky state, I'm thinking that some comforting soup might be in order.